Integration Guide
Introduction
Signer is a web portal of documents that enables digital and electronic signatures as well as the creation of complex document flows. This document discusses possible integration options so that your application can make the most of Signer's potential.
Authentication
All API calls demand one API Key in order to communicate with Signer. This key must be placed in the Header of all requests:
X-Api-Key: your-application|xxxxxxxxxxxxxxxxxxxxxxxxxxxxxxxxxxxxxxxxxxxxxxxxxxxxxxxxxxxxxxxx
Every API Key is associated with an Organization previously registered in Signer. Therefore, the scope of this key is restricted to that organization, that key will only allow you to access/create documents from that same organization.
Note
In order to obtain an API key, contact your instance administrator.
Integration Options
Choose one of the use cases below:
Sign a document
In order to sign a document, follow the steps below:
1- Upload the file that will be signed using the upload API (POST /api/uploads). The file must be sent through a request multipart/form-data. An upload ID that identifies that file will be returned:
{
    ...
    "id": "3fa85f64-5717-4562-b3fc-2c963f66afa6"
}
Alternatively the simplified upload API (POST /api/uploads/bytes) can be used. Here, bytes can be sent in Base64 format.
2- Create a document from the uploaded file using the document creation API. In this call, you must assemble the document flow and define which will be the document's participants and in what order they should take their actions:
POST /api/documents

{
    "files": [
    {
        "displayName": "Integration Contract", //Name that will be given to the created document
        "id": "3fa85f64-5717-4562-b3fc-2c963f66afa6", //File's upload ID
        "name": "Contract.pdf", //Name of the original file
        "contentType": "application/pdf" //Original file mime type
    }
    ],
    "flowActions": [
    {
        "type": "Signer",//Type of participant, in this scenario, signer
        "step": 1,//Signing order
        "user": {
        "name": "John Wick",//Participant's name
        "identifier": "81976153069",//Participant's identifier number
        "email": "john.wick@mailinator.com",//Participant's email
        },
        "allowElectronicSignature": true //Allows eletronic signature
    }
    ]
}
Tip
You can create more than one document in the same document creation call, adding as many files as needed. In this scenario, all documents will share the same document flow.
The response will return the ID of the created document associated with the upload ID, so you know exactly which document matches which upload:
[
    {
    "uploadId": "3fa85f64-5717-4562-b3fc-2c963f66afa6",
    "documentId": "b12cb1b2-5d6e-40b2-a050-097d068c4c11"
    }
]
When the document is created, Signer automatically notifies the participants added to the flow in the specified order.
Each participant will receive an email with a link that will allow them to sign/approve the document.
Tip
It is not necessary to authenticate (Log in) in order to sign or approve a document.
For further details related to these scenarios, see our examples on GitHub:
C#:
Java:
PHP:
Node.js:
Signing in your own application
If you want to sign the document in your own application, you can use the Embedded Signature option.
To do so, you must follow the same steps shown in the previous section, however, when sending the document, it is recommended to add the parameter
disablePendingActionNotifications sett as true. Thus, notifications will not be considered for participants.
After the creation of the document, send the document ID to get the Subscription URL using the URL action API:
POST /api/documents/b12cb1b2-5d6e-40b2-a050-097d068c4c11/action-url

{
    //The information must be sent to identify the participant
    "identifier": "81976153069",
    "emailAddress": "john.wick@mailinator.com"
}
If the user has allowed electronic signature in the current document (by using the parameter allowElectronicSignature = true during document upload), it is possible to require an e-mail confirmation through a 6-digit code asked during the signature stage. To use this feature, one must enable the requireEmailAuthentication parameter as shown in the example below:
POST /api/documents/b12cb1b2-5d6e-40b2-a050-097d068c4c11/action-url

{
    //The information must be sent to identify the participant
    "identifier": "81976153069",
    "emailAddress": "john.wick@mailinator.com"
    // If action is an electronic signature and this parameter is set to true, requires e-mail authentication with code in order to complete the signature.
    "requireEmailAuthentication": true
}
The response will present two URLs:
{
    //URL to redirect the user to the Signer subscription page
    "url": "https://...",
    //URL to use the signing Widget
    "embedUrl": "https://..."
}
Once you get the embedUrl URL, use the Subscription Widget to display the Signer's signing page in your application.
The section Embedded signature describes how to use the Widget.
For further details related to these scenarios, see our examples on GitHub:
Pre-positioning a signature on the document
During the creation of a document, it is possible to place each user's signatures in a specific place in the same document. All attribute definitions
are done during the creation of the flowAction. There are options to define the location of the signature on a page, as well as the page where you want to pre-position a signature.
For further details related to these scenarios, see our examples on GitHub:
Check the document status
To check the status of a document, you need to provide its ID. Then just call the Documents Details API:
GET /api/documents/b12cb1b2-5d6e-40b2-a050-097d068c4c11

{
    "id": "b12cb1b2-5d6e-40b2-a050-097d068c4c11",
    "name": "Integration Contract",
    "status": "Concluded",
    "creationDate": "2019-08-18T16:26:03.372Z",
    "updateDate": "2019-08-18T16:26:03.372Z",
    ...
    "flowActions": [
        {
            "id": "4bf61c68-eaf1-455f-b4a1-6141554f1dae",
            "type": "Signer",
            "status": "Completed",
            "step": 1,
            ...
            "user":
            {
                "id": "4d961566-9b03-450c-b144-930e0294bac2",
                "name": "John Wick",
                "identifier": "81976153069",
                "email": "john.wick@mailinator.com"
            },
            "title": "Parte",
            "allowElectronicSignature": true
        }
    ]
}
- To find out if the document is completed, check the property
statuscorresponds toConcluded. - To find out if a participant has signed/approved the document, check if the property
statuscorresponds toCompletedfor the corresponding action in the flow actions list (flowActions).
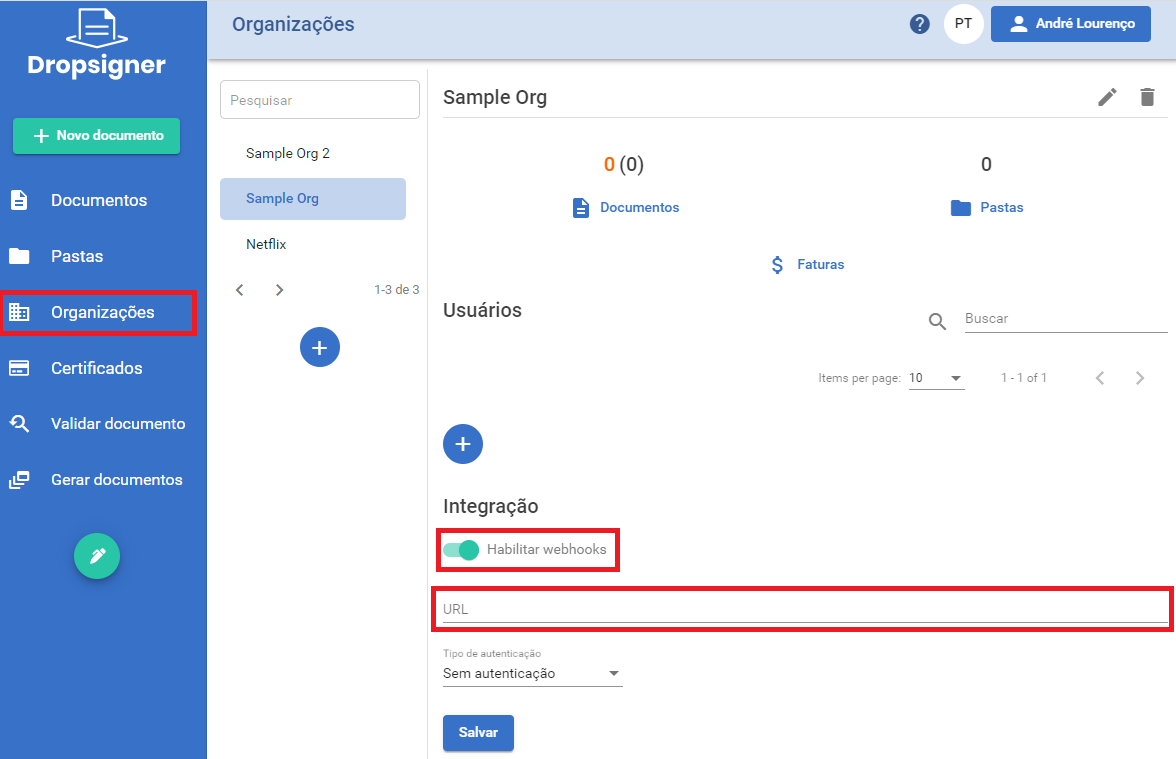
Additionally, you can set up a Webhook that will be triggered every time a document from your organization is completed, approved, declined or signed. For that, access the Organization page and register the required URL in the Integration option:
For further details related to these scenarios, see our examples on GitHub:
Send signing reminders
Once the status of a participant has been verified using Check the Document Status,
you can send periodic reminders to the flow participants who have not yet completed an action. Reminders Sending API.
To do this, provide the document ID and the participant's action ID(flowActionId):
POST /api/notifications/flow-action-reminder

{
    "documentId": "b12cb1b2-5d6e-40b2-a050-097d068c4c11",
    "flowActionId": "4bf61c68-eaf1-455f-b4a1-6141554f1dae"
}
For further details related to these scenarios, see our examples on GitHub:
Download documents versions
Once a document has been created, it is possible to download different types of versions of the same document. If you want to download the document, use the Document Download API.
GET /api/documents/b12cb1b2-5d6e-40b2-a050-097d068c4c11/content?type=Original
The options available for download are:
- Signed file
- Printer friendly version
- Signing Tags
- Original file
There are two types of data returns: The first one will return the document as a Stream of data and the second one will return the document as a vector of bytes[].
For further details related to these scenarios, see our examples on GitHub:
List documents
It is possible to list documents according to different patterns and needs. The parameters used are available in the Document Listing API. The types of lists that can be returned are identified below:
- Pending documents for a particular participant
- Concluded documents
- List by folders
- List by organizations
For further details related to these scenarios, see our examples on GitHub:
Validate document's signatures
You can validate a document's signatures in two different ways: with the document validation key (if it was signed in this instance of Signer) or with the file signed.
Document validation with validation key
To validate a document with a validation key, use the Validation Key API providing its corresponding key.
The document's primary data and every signature information found in the document will be returned:
GET /api/documents/keys/AX4F8FV8NNAX25TENE2S/signatures

{
    "id": "b12cb1b2-5d6e-40b2-a050-097d068c4c11",
    "name": "Integration Contract",
    "filename": "Contrato.pdf",
    "mimeType": "application/pdf",
    "isConcluded": true,
    ...
    "creationDate": "2020-08-18T16:38:40.538Z",
    "updateDate": "2020-08-18T16:38:40.538Z",
    "signers": [
        {
            "subjectName": "John Wick",
            "emailAddress": "john.wick@mailinator.com",
            "issuerName": "Lacuna CA",
            "identifier": "81976153069",
            "companyName": null,
            "companyIdentifier": null,
            "isElectronic": false,
            "signingTime": "2020-08-18T16:38:40.538Z",
            "certificateThumbprint": "a0sRR9cWOc0PORMhTBg49ub/5BO3W5vWQ1w7+YquK5g=",
            ...
            "validationResults":
            {
                ...
                "isValid": true
            }
        }
    ]
}
Document validation with signed file
To validate a signed document, you must upload the signed file using the Upload API or the Simplified Upload API (POST /api/uploads/bytes) as shown in the section Sign a Document.
Then use the Signed File Validation API.
POST /api/documents/validate-signatures

{
  "fileId": "f5ea05d7-0a5f-4933-a6d6-9a8aa3955b14",
  "mimeType": "application/pdf"
}
Each signature data found in the document will be returned.
[
    {
        "subjectName": "John Wick",
        "emailAddress": "john.wick@mailinator.com",
        "issuerName": "Lacuna CA",
        "identifier": "81976153069",
        "companyName": null,
        "companyIdentifier": null,
        "isElectronic": false,
        "signingTime": "2020-08-18T16:38:40.538Z",
        "certificateThumbprint": "a0sRR9cWOc0PORMhTBg49ub/5BO3W5vWQ1w7+YquK5g=",
        ...
        "validationResults":
        {
            ...
            "isValid": true
        }
    }
]
Delete document
To delete a document you need to have it ID and make a DELETE request.
DELETE /api/documents/b12cb1b2-5d6e-40b2-a050-097d068c4c11
For further details related to these scenarios, see our examples on GitHub:
Cancel document
If you want to cancel a document, it is necessary to send the document ID through a POST request filling the body field reason as we show in the example below:
POST /api/documents/b12cb1b2-5d6e-40b2-a050-097d068c4c11/cancellation

{
    "reason": "This is a document cancellation"
}
For further details related to these scenarios, see our examples on GitHub:
Refuse a document
If you want to refuse a document, it is necessary to send the document ID through a POST request filling the body field reason as we show in the example below:
POST /api/documents/b12cb1b2-5d6e-40b2-a050-097d068c4c11/refusal

{
    "reason": "This is a document refusal"
}
For further details related to these scenarios, see our examples on GitHub:
Submit new document version
It is possible to upload a new document version for an already created document. Therefore, it is necessary to send the document ID through a POST request followed by the new version corresponding file. It is necessary to emphasize that signing flow will reset.
For further details related to these scenarios, see our examples on GitHub:
Merge multiple files in a single document
It is possible to upload multiple files and then merge their signatures in a single document (envelope). In order to achieve that, it is necessary to add isEnvelope=true parameter and a required EnvelopeName parameter to define the name of the envelope. It is important to note that the merging only works if all file types are PDF.
For further details related to these scenarios, see our examples on GitHub: