Installing Amplia on Windows Server
To install an on-premises instance of Amplia on Windows Server, follow the steps below. For other platforms, click here.
Tip
Before you start, make sure you have completed the steps outlined on Planning before installation
Prerequisites
- Windows Server 2016 or newer (any edition)
- PKI SDK license (in Base64 format)
- Web PKI license (Base64/binary format) -- only needed if users will issue certificates on their computers (web issuing procedure)
- DNS entries previously created for:
- Dashboard access (see Dashboard domain)
- CRL publishing (see Access domains)
- Connection string to a previously created SQL Server or PostgreSQL database
Installation
- Install IIS
- https://aka.ms/dotnetcore-3-1-windowshosting
- Create folder for site
- Create folder for logs
Create site
- Set no managed code
Set load user profile to
True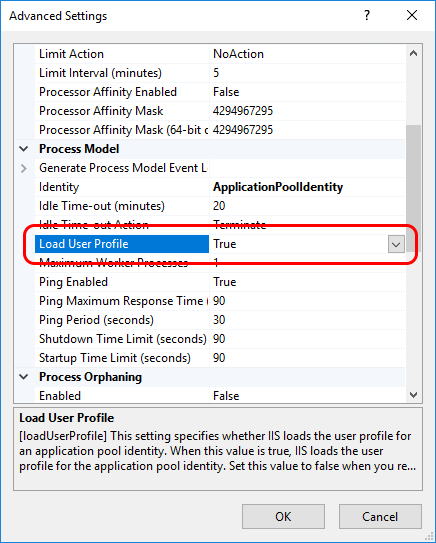
Extract files
Configuration
On the installation folder, move the file appsettings.iis.json from the folder config-templates to the root folder of the site. Then, edit the file to configure your Amplia instance.
Database connection string
Under section ConnectionStrings, on the setting DefaultConnection, set the connection string to the previously created database. A typical connection string looks like this:
Data Source=SERVER;Initial Catalog=DATABASE;User ID=USERNAME;Password=PASSWORD
Note
If you created the database using advanced features such as log shipping or mirroring, your connection string may be different
Logging
Under section Serilog, configure the application logging:
...
"Serilog": {
    "MinimumLevel": {
        "Default": "Warning",
    },
    "WriteTo": [
        {
            "Name": "File",
            "Args": {
                "path": "C:\\Logs\\Amplia.log",
                "outputTemplate": "{Timestamp:yyyy-MM-dd HH:mm:ss.fff zzz} [{Level:u3}] [{SourceContext}] {Message:lj}{NewLine}{Exception}",
            }
        }
    ],
}
...
Change the path setting to the log file path.
Note
Remember to grant full access to the application user on the log folder
Then, under section General:
- SiteUrl: publicly accessible URL of the website (e.g.:
https://ca.patorum.com/). This address is used to compose emails with links back to the website - EncryptionKey: encryption key generated above
- RootPasswordHash: hash of the root password, computed above
- AutoUpdateDatabase: by default, the application tries to perform model changes to the database after an update (when needed). Set to
falseif the application does not have owner permissions over the database - SupportEmailAddress: the support email address (used on the footer of outgoing emails)
To generate the EncryptionKey, run the following on a Powershell:
$k = New-Object byte[] 32;
[System.Security.Cryptography.RandomNumberGenerator]::Create().GetBytes($k);
[Convert]::ToBase64String($k);
Bindings
Under section Bindings:
- HttpsMode: by default, both the dashboard and the REST APIs can only be accessed through HTTPS, which is the recommended behavior if you have a valid SSL certificate.
- If you do not have a valid SSL certificate, set this setting to
Optional. Users accessing the dashboard will not be redirected to HTTPS and REST APIs will be accessible through HTTP. - If you have a valid SSL certificate but some legacy client applications do not recognize it, set this setting to
RedirectPages. REST APIs will still be accessible through HTTP (like inOptionalmode), but users accessing the dashboard will be redirected to HTTPS.
- If you do not have a valid SSL certificate, set this setting to
- SslPort: by default, users accessing the dashboard through HTTP are redirected to HTTPS on the standard TCP port 443. If the site is using HTTPS on a non-standard port, set it here.
Amplia settings
Under section Amplia:
- DatabaseKeyStoreEnabled: to enable the database key store, set this to
true - DefaultKeyStore: the default key store on which to create new keys (see Key storage)
- DefaultAccessDomains: domains to be used when composing the CRL distribution points (see Access domains)
File storage
In order to keep the database tidy, Amplia stores files outside of the database. Files may be stored in different providers.
The section Storage configures the file storage. The setting Type defines which provider should be used, and the remaining settings depend on the provider chosen:
- File system
- Type: set this setting to
FileSystemto store files on the local file system - Path: set the path of the folder on which to store files. Make sure the application has access to the folder
- Type: set this setting to
- Azure Storage
- Type: set this setting to
Azureto store files on an Azure Storage account - ConnectionString: provide a connection string to the account
- ContainerName: the name of the blob container on which to store files
- Type: set this setting to
- Amazon S3 (coming soon, contact us if you need it)
PKI Suite
Under section PkiSuite:
- SdkLicense: your license for the PKI SDK, in Base64 format (required)
- WebLicense: your license for the Web PKI component in binary (Base64) format. Only required if users will issue certificates on their computers (web issuing procedure)
- WebBrand: if you have a custom setup brand on Web PKI, set it here
Email sending
Under section Email:
- Enabled: by default, email sending is enabled. To disable it, set this setting to
falseand ignore the remainder of this section - ServerHost: hostname of the SMTP server
- EnableSsl: by default, the SMTP conversation is performed over SSL. To disable SSL, set this setting to
false - ServerPort: by default, the SMTP conversation is performed over port 587. Set this setting to use a different port
- Username and Password: if the SMTP server requires authentication, set these settings
- SenderAddress: email address to be used as sender (from field)
- SenderName: name to be used as the sender name (optional)
Open ID Connect configuration
The section Oidc configures the OpenID Connect server, required by Amplia for user management. For now, leave the setting
Enabled as false and use the root password to authenticate. Later, see Configure OpenID Connect
if you want to enable user management.
SMS sending
If users will issue certificates (either web or mobile issuing procedure), a SMS confirmation is required to confirm the identity of the user during the certificate issue procedure. SMS messages may be sent using different providers.
The section SMS configures the SMS sending. The setting Type defines which provider should be used, and the remaining settings depend on the provider chosen:
- Twilio
- Type: set this setting to
Twilioto send SMS messages using Twilio - MessageFrom: the sender phone number provided by Twilio (e.g.:
+12125550000) - AccountSid: the account SID, provided by Twilio
- AuthToken: the authentication token, provided by Twilio
- Type: set this setting to
- TotalVoice
- Type: set this setting to
TotalVoiceto send SMS messages using TotalVoice - AccessToken: the access token, provided by TotalVoice (e.g.:
0123456789abcdef0123456789abcdef)
- Type: set this setting to
- Simulator (for debugging purposes only)
- Type: set this setting to
Simulatorto simulate sending SMS messages (messages that would be sent are only logged)
- Type: set this setting to
Key store configuration
On the section KeyStores, each key is the name of a key store, having as value a section with the key store's configuration. For instance:
...
"KeyStores": {
  "Store1": {
    "Type": "...",
    "Setting1": "...",
    "Setting2": "..."
  },
  "Store2": {
    "Type": "...",
    "Setting1": "...",
    "Setting2": "...",
    "Setting3": "..."
  },
}
...
The setting Type on each key store configuration defines the type of the key store, and the remaining settings depend on the provider chosen. See article Key Store configuration for details.
Starting up application
- Start site
- Access site