Signer - Setup on Windows Server
To install an on-premises instance of Signer on Windows Server, first download binaries of the desired version. The latest version available is provided in the link below:
Prerequisites
- Windows Server 2012 or newer (any edition)
- SQL Server 2014 or newer (recommended edition Standard or better)
- PKI SDK license (in Base64 format)
- Web PKI license (Base64/binary format)
Database Requirements
- Database with collation
Latin1_General_100_CI_AIorLatin1_General_CI_AI. - Credentials corresponding to a user with
db_ownerrole.
If you need help preparing the database, click here.
Installation
- Install IIS
- Install NET 8.0 Hosting Bundle
- Create folder for IIS site. Example:
C:\inetpub\Signer - Create folder for logs. Example:
C:\Logs - Create site on IIS
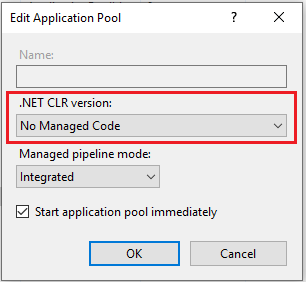
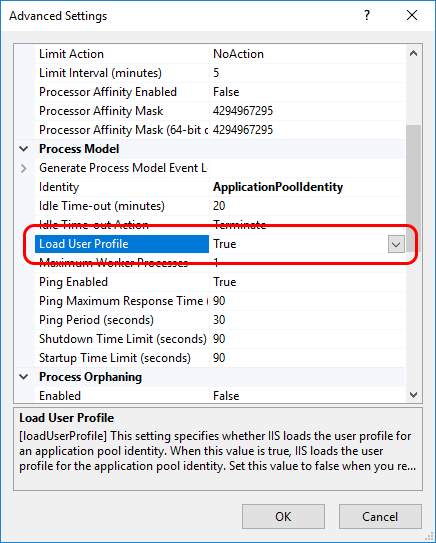
In the corresponding Application pool:
Select Basic Settings and set the .NET CLR version to
No managed code
Select Advanced Settings and set load user profile to
True
Extract the files in the binaries package to the site folder.
Warning
The .NET Core Hosting Runtime should be installed after IIS, otherwise when running the website you may receive the error 500.19 (0x8007000d).
If this is your case, run the "Repair" option of the Hosting Runtime installer.
Configuration
On the installation folder, move the file appsettings.iis.json from the folder config-templates to the root folder of the site. Then, edit the file to configure your instance.
This file is organized in sections whose children nodes represent setting names. For instance: for the General section, to
configure the SupportEmailAddress, add/edit a Section with name General and add/edit the child with name SupportEmailAddress:
...
"General": {
    "SupportEmailAddress": "support@email.com"
}
...
The required settings are presented below.
Database connection string
Under section ConnectionStrings:
- DefaultConnection: set the connection string to the database. A typical connection string looks like this:
Data Source=SERVER;Initial Catalog=DATABASE;User ID=USERNAME;Password=PASSWORD
Note
If you created the database using advanced features such as log shipping or mirroring, your connection string may be different
Logging
Under section Serilog, configure the application logging:
...
"Serilog": {
    "MinimumLevel": {
        "Default": "Warning"
    },
    "WriteTo": [
        {
            "Name": "File",
            "Args": {
                "path": "C:\\Logs\\Signer.log",
                "outputTemplate": "{Timestamp:yyyy-MM-dd HH:mm:ss.fff zzz} [{Level:u3}] [{SourceContext}] {Message:lj}{NewLine}{Exception}"
            }
        }
    ]
}
...
Change the path setting to the log file path.
Note
Remember to grant full access to the application user on the log folder
Open ID Connect configuration
The section Oidc configures the OpenID Connect server, required for user management. A GrantID subscription is required.
You can either use a SaaS subscription on grantid.com or run your own instance of GrantID.
- Authority: the OIDC authority (e.g. https://patorum.grantid.com)
- ApiEndpoint: the API endpoint of the OIDC server (e.g. https://api.grantid.com)
- ApiName: the API scope that will be required on access tokens
- ClientAppId: the client id of the dashboard app
- AppId: the client id of the backend app
- AppSecret: the client secret of the backend app
- RequireHttps (optional): set to
falseif the OIDC server does not use HTTPS
See Configuring a SPA Application page for instructions on how to obtain these values.
PKI Suite
Under section PkiSuite:
- SdkLicense: your license for the PKI SDK, in Base64 format (required)
- WebLicense: your license for the Web PKI component in binary (Base64) format. Only required if users will issue certificates on their computers (web issuing procedure)
- WebBrand: if you have a custom setup brand on Web PKI, set it here
General Configuration
Then, under section General:
- SiteName: the name of this instance. It will be used in generated documents and emails
- SiteUrl: publicly accessible URL of the website (e.g.:
https://signer.patorum.com/). This address is used to compose emails with links back to the website - AutoUpdateDatabase: by default, the application tries to perform model changes to the database after an update (when needed). Set to
falseif the application does not have owner permissions over the database - SupportEmailAddress: the support email address (used on the footer of outgoing emails)
Bindings Configuration
- UseReverseProxy: set as
trueif the instance will be executed behind a reverse proxy or load balancer. It can be omitted otherwise.
Email sending
Under section Email:
- Enabled: by default, email sending is enabled. To disable it, set this setting to
falseand ignore the remainder of this section - ServerHost: hostname of the SMTP server
- EnableSsl: by default, the SMTP conversation is performed over SSL. To disable SSL, set this setting to
false - ServerPort: by default, the SMTP conversation is performed over port 587. Set this setting to use a different port
- Username and Password: if the SMTP server requires authentication, set these settings
- SenderAddress: email address to be used as sender (from field)
- SenderName: name to be used as the sender name (optional)
Additional Configuration
Additional settings can be found at the Signer Settings page.
Starting up application
- Start IIS site
- Access the site URL
Updating application
Before updating your instance, it is recommended to check the Changelog to see what has changed from your current version to the latest one available.
If any of the versions included in the update have database model changes ("Updates database model: yes") then you should procceed carefully as the instance will attempt to update the database upon startup.
In this scenario, it is recommended to choose one of the following options:
- Reduce the number of instances to 1 (if you have multiple servers).
- Allow only one instance to update the database. This is done by adding/editing the following settings to all but one instance:
"General": {
    "ProcessBackgroundJobs": "false",
    "AutoUpdateDatabase": "false"
}
Update procedure
- Stop the site in IIS Manager.
- Create a backup of database and site folder.
- Download and extract the contents of the new binaries package to the site folder, overwriting all files.
- Make any necessary changes to the file
appsettings.iis.json. - Start the site in IIS Manager.
Note
The appsettings.iis.json file with your instance settings will be preserved, because in the package there is no file with that name.