Installing GrantID on Windows Server
Note
The documentation for this system is currently under construction. We apologize for any inconvenience this may cause. Please contact us if there's any information you need that is not currently documented.
IIS Setup
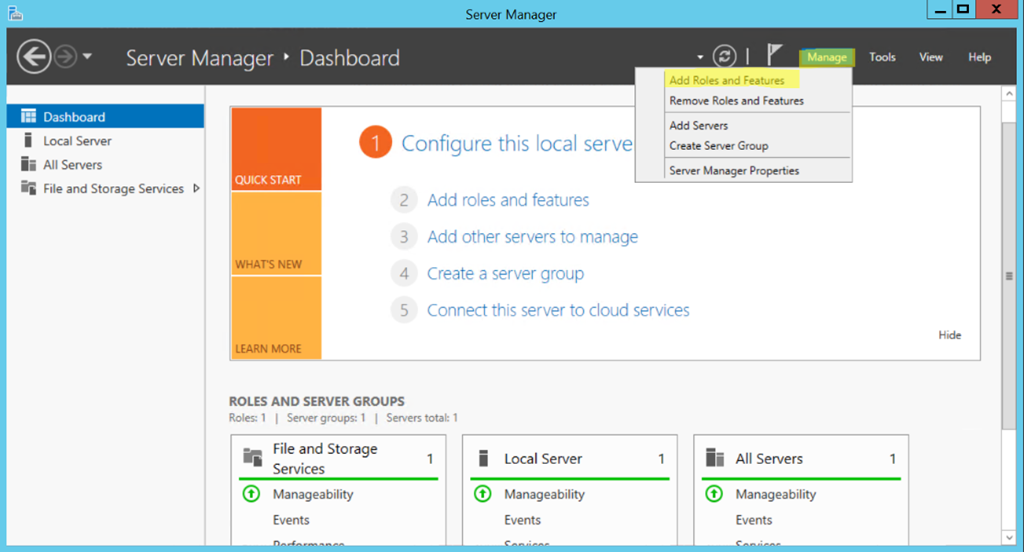
- Open Server Manager and select the "Add Roles and Features" option:
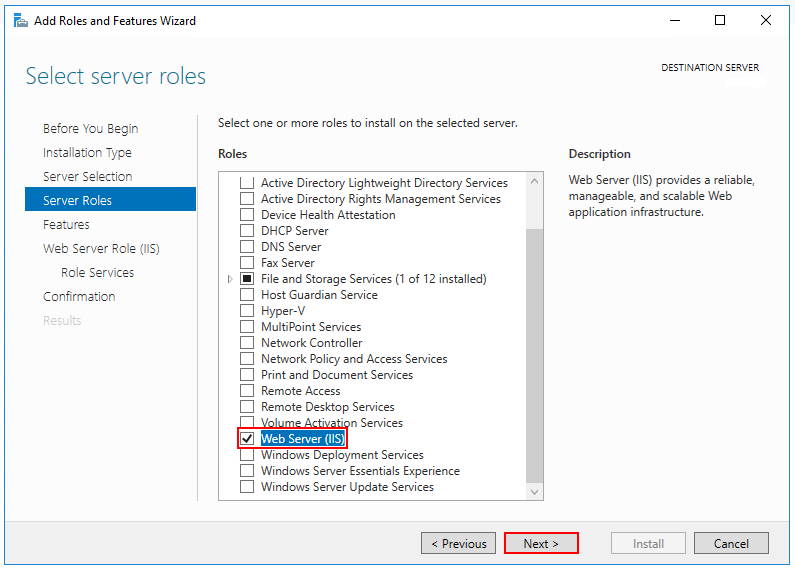
- In the Server Roles section, select Web Server (IIS):
- In the Role Services section, select the desired services or accept the default options:

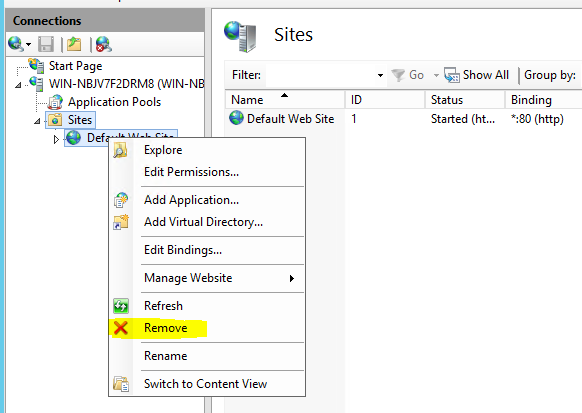
- Open Internet Information Services (IIS) Manager and remove the Default Web Site:
.NET Core Setup
- Download and install the Microsoft Visual C++ 2015 Redistributable package
- Download and install the NET 8.0 Hosting Bundle. If a install option is not displayed, choose the repair option instead.
- (Only for Windows Server 2012 or lower) Download and install the Windows Management Framework (WMF) 5.1
Warning
After the installation is complete, the server must be restarted.
Installation Package Overview
An installation package named grantid-<version_number>.zip will be made available whenever you need to install/update GrantID.
GrantID is composed by 3 components:
- IdentityService: REST service that must have access to a SQL Server Database.
- AuthServer: OAuth 2.0 and OpenID Connect autorization server.
- Console: console interface to setup applications.
The components may be installed in different servers or in the same, according to your needs, given that the following requirements are met:
- The AuthServer must have network access to the IdentityService.
- The Console must have network access to the IdentityService. It does not need explicit network access to the AuthServer, but it may redirect an user to it, as all logins/registrations are handled by the AuthServer.
- The IdentityService must be updated before the other two components, since they rely on it's APIs.
Package folder structure:
- Tools: contains binaries that may be used to generate certificates and keys. Requires NET Framework 4.5.2 to run.
- Keys: contains the development certificate and key.
- Config: contains the configuration files used to set up the components.
- Components: contains the binaries of all the components.
Installation instructions
Start by creating a working directory, for example: C:\GrantId-Install.
Unzip the installation package in the root of the working directory (It already contains a folder named grantid). If there are already files from previous installs, override them (see Update Instructions).
When installing to a production environment for the first time, you need to generate a certificate and a key for your environment.
Generating the Certificate and Key files
The GrantID.pfx certificate will be used to sign application tokens issued by GrantID. To generate a new certificate :
$cert = New-SelfSignedCertificate -Type Custom -Subject "CN=<certificate_name>" -TextExtension @("2.5.29.37={text}1.3.6.1.5.5.7.3.2,1.3.6.1.5.5.7.3.1") -KeyUsage DigitalSignature, KeyEncipherment -KeyAlgorithm RSA -KeyLength 4096 -CertStoreLocation "Cert:\CurrentUser\My" -NotAfter (Get-Date).AddYears(100).AddHours(-5)
$pass = ConvertTo-SecureString -String "pass" -Force -AsPlainText
Export-PfxCertificate -Cert ("Cert:\CurrentUser\My\" + $cert.Thumbprint) -Password $pass -FilePath .\GrantId.pfx
Get-ChildItem ("Cert:\CurrentUser\My\" + $cert.Thumbprint) | Remove-Item
Example:
$cert = New-SelfSignedCertificate -Type Custom -Subject "CN=GrantID" -TextExtension @("2.5.29.37={text}1.3.6.1.5.5.7.3.2,1.3.6.1.5.5.7.3.1") -KeyUsage DigitalSignature, KeyEncipherment -KeyAlgorithm RSA -KeyLength 4096 -CertStoreLocation "Cert:\CurrentUser\My" -NotAfter (Get-Date).AddYears(100).AddHours(-5)
$pass = ConvertTo-SecureString -String "pass" -Force -AsPlainText
Export-PfxCertificate -Cert ("Cert:\CurrentUser\My\" + $cert.Thumbprint) -Password $pass -FilePath .\GrantId.pfx
Get-ChildItem ("Cert:\CurrentUser\My\" + $cert.Thumbprint) | Remove-Item
Move the generated file to the Keys directory.
The key.xml is used to protect cookies and secrets generated by GrantID. Navigate to the Tools directory using Powershell as administrator and execute the command:
.\grantid.exe genkey [output_directory]
Example:
.\grantid.exe genkey
Move the generated file to the Keys directory.
Configuring components
Before actually publishing the components, please review and configure each of the components.
Navigate to the Config directory. If you're installing for the first time, all files will have the -Sample suffix.
For each component (and the common files):
Note
If you already have a XML and JSON files that do not have the -Sample suffix for that component, you should just review/update the settings in the files and skip the next two steps.
- Remove the
-Samplesuffix for the component's XML file. This file contains settings relative to the IIS website that will be created for the app. Edit the file according to your preferences. - Remove the
-Samplesuffix for the component's JSON file. This file contains components settings such as Log file path, connection strings etc (see Configuration file guide). Edit the file according to your preferences.
Publishing components
Before publishing the components it may be necessary to allow execution of powershell scripts with the following command:
Set-ExecutionPolicy Bypass -Scope LocalMachine
After the configuration files of all components are ready, you may publish a component by executing the component's installation script with Poweshell as Administrator:
.\Install-<component>.ps1
- The script will show the settings defined in the Config folder and prompt the user if he wants to continue or not. You may skip that check with the
NoPromptargument as such:
.\Install-<component>.ps1 NoPrompt
Always start by publishing IdentityService, then AuthServer and finally Console:
.\Install-IdentityService.ps1
.\Install-AuthServer.ps1
.\Install-Console.ps1
After all components are installed, you should configure SSL bindings for each IIS app (if necessary).
After AuthServer is installed and bindings configured, it may be necessary to give AuthServer application pool full access to the GrantID certificate:
- Go to Manage computer certificates.
- Select the certificate and with a right-click select All tasks - Manage private key.
- Enter IIS AppPool\AuthServer_App and select OK.
- Make sure
Full controlis selected and press Apply then OK.
Update instructions
Unzip the new installation package in the root of the working directory and overwrite all files.
Your settings will remain unchanged because the new installation package won't contain files without the -Sample suffix.
Check the configuration files for all components by going to the Config folder. You may check the files with the -Sample suffix for newly added or removed settings.
Execute each component installation script as shown in the Publishing components section.
Troubleshooting
If you encounter a registry key denied access error like shown below:
System.UnauthorizedAccessException: Access to the registry key 'HKEY_LOCAL_MACHINE\SOFTWARE\GrantID\Keys' is denied.
Check if the IIS App Pool identities for all modules have received the Full control permissions on the key registry:
- Open the Registry Editor.
- Navigate to
Computer\HKEY_LOCAL_MACHINE\SOFTWARE\GrantID\Keysfolder and click thePermissions...option. - Check that all IIS App Pool identities (
IIS AppPool\AuthServer_App,IIS AppPool\IdentityService_AppandIIS AppPool\Console_App) have Full Control permission. If anyone is missing add it. - Restart the corresponding IIS websites if any identity was missing.